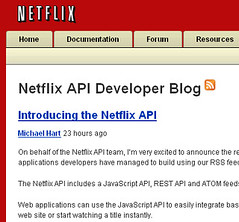
 As a longtime avid Netflix fan, I was excited to see that they finally released an official API today. As an avid fan of the Open Web, I was even more excited to see that this API gives users full access to their ratings, reviews, and queue, and it does so using a familiar REST interface, with output available in XML, JSON, and ATOM. It even uses OAuth to grant access to protected user data, meaning you can pick up an existing OAuth library and dive in (well, almost, see below). Netflix has done a great job here, and deserves a lot of kudos!
Naturally, I couldn’t wait to get my hands on the API and try it out for real. After a bit of tinkering, I’ve now got it working so it gives me my own list of ratings, reviews, and recently returned movies, including as an ATOM feed that can be embedded as-is into a feed reader or aggregator. It was pretty straightforward, but I noticed a couple of non-standard things and gotchas along the way, so I thought it would be useful to share my findings. Hopefully this will help you get started with Netflix’s API even faster than I did!
So here’s how to get started with the Netflix API and end up with an ATOM feed of your recently returned movies:
- Sign up for mashery (which hosts Netflix’s API) at http://developer.netflix.com/member/register (you have to fill out some basic profile info and respond to an email round-trip)
- Register for an application key at http://developer.netflix.com/apps/register (you say a bit about what your app does and it gives you a key and secret). When you submit the registration, it will give you a result like this:
Netflix API: k5mds6sfn594x4drvtw96n37 Shared Secret: srKNVRubKX
The first string is your OAuth Consumer Key and the second one is your OAuth Consumer Secret. I’ve changed the secret above so you don’t add weird movies to my account, but this gives you an idea of what it looks like. 🙂
- Get an OAuth request token. If you’re not ready to start writing code, you can use an OAuth test client like http://term.ie/oauth/example/client.php. It’s not the most user-friendly UI, but it will get the job done. Use HMAC-SHA1 as your signature method, and use http://api.netflix.com/oauth/request_token as the endpoint. Put your newly issued consumer key and secret in the spaces below, and click the “request_token” button. If it works, you’ll get a page with output like this:
oauth_token=bpn8ycnma7hzuwec5dmt8f2j&oauth_token_secret=DArhPYzsUCkz&application_name=JosephSmarrTestApp&login_url=https%3A%2F%2Fapi-user.netflix.com%2Foauth%2Flogin%3Foauth_token%3Dbpn8ycnma7hzuwec5dmt8f2j
Your OAuth library should parse this for you, but if you’re playing along in the test client, you’ll have to pull out the OAuth Request Token (in this case,
bpn8ycnma7hzuwec5dmt8f2j) and OAuth Request Secret (DArhPYzsUCtt). Note it also tells you theapplication_nameyou registered (in this case,JosephSmarrTestApp), which you’ll need for the next step (this is not a standard part of OAuth, and not sure why they require you to pass it along). They also give you alogin_url, which is also non-standard, and doesn’t actually work, since you need to append additional parameters to it. - Ask the user to authorize your request token. Here the OAuth test client will fail you because Netflix requires you to append additional query parameters to the login URL, and the test client isn’t smart about merging query parameters on the endpoint URL with the OAuth parameters it adds. The base login URL is https://api-user.netflix.com/oauth/login and as usual you have to append your Request Token as oauth_token=bpn8ycnma7hzuwec5dmt8f2j and provide an optional callback URL to redirect to the user to upon success. But it also makes you append your OAuth Consumer Key and application name, so the final URL you need to redirect your user to looks like this:
This is not standard behavior, and it will probably cause unnecessary friction for developers, but now you know. BTW if you’re getting HTTP 400 errors on this step, try curl-ing the URL on the command line, and it will provide a descriptive error message that may not show up in your web browser. For instance, if you leave out the application name, e.g.
curl ‘https://api-user.netflix.com/oauth/login?oauth_token=bpn8ycnma7hzuwec5dmt8f2j&oauth_callback=YOUR_CALLBACK_URL&oauth_consumer_key=k5mds6sfn594x4drvtw96n37’You’ll get the following XML response (I’ve replaced the angle brackets with [] because wordpress keeps eating my escaped tags, grr):
[status]
[status_code]400[/status_code]
[message]application_name is missing[/message]
[/status]If your login URL is successfully constructed, it will take the user to an authorization page that looks like this:
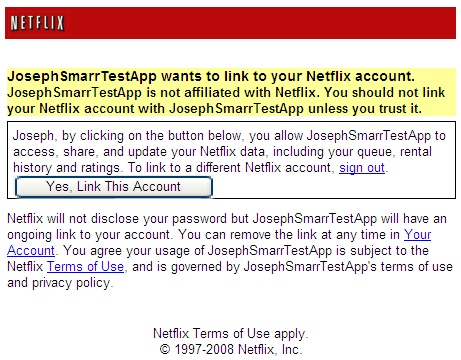
If the user approves, they’ll be redirected back to your oauth_callback URL (if supplied), and your request token has now been authorized.
- Exchange your authorized request token for an access token. You can use the OAuth test client again for this, and it’s basically just like getting the request token, except the endpoint is http://api.netflix.com/oauth/access_token and you need to fill out both your consumer token and secret as well as your request token and secret. Then click the access_token button, and you should get a page with output like this:
oauth_token=T1lVQLSlIW38NDgeumjnyypbxc6yHD0xkaD21d8DpLVaIs3d2T1Aq_yeOor9PCIW2Bz5ksIPr7aXBKvTTg599m9Q–&user_id=T1G.NK54IqxGkXi3RbkKgudF3ZFkmopPt3lR.dlOLC898-&oauth_token_secret=AKeGYam8NJ4X
(Once again I’ve altered my secret to protect the innocent.) In addition to providing an OAuth Access Token and OAuth Access Secret (via the oauth_token and oauth_token_secret parameters, respectively), you are also given the user_id for the authorized user, which you need to use when constructing the full URL for REST API calls. This is non-standard for OAuth, and you may need to modify your OAuth library to return this additional parameter, but that’s where you get it. (It would be nice if you could use an implicit userID in API URLs like @me, and it could be interpreted as “the user that granted this access token”, so you could skip this step of having to extract and use an explicit userID; that’s how Portable Contacts and OpenSocial get around this problem. Feature request, anyone?)
- Use your access token to fetch the user’s list of protected feeds. Having now successfully gone through the OAuth dance, you’re now ready to make your first protected API call! You can browse the list of available API calls at http://developer.netflix.com/docs/REST_API_Reference and in each case, the URL starts out as http://api.netflix.com/ and you append the path, substituting the user_id value you got back with your access token wherever the path calls for userID. So for instance, to get the list of protected ATOM feeds for the user, the REST URL is http://api.netflix.com/users/userID/feeds, or in this case http://api.netflix.com/users/T1G.NK54IqxGkXi3RbkKgudF3ZFkmopPt3lR.dlOLC898-/feeds.
Here’s where the OAuth test client is a bit confusing: you need put that feeds URL as the endpoint, fill out the consumer key and secret as normal, and fill out your *access* token and secret under the “request token / secret” fields, then click the “access_token” button to submit the OAuth-signed API request. If it works, you’ll get an XML response with a bunch of links to different protected feeds available for this user. Here’s an example of the response, showing just a couple of the returned links, and again with angle brackets replaced with square brackets to appease my lame wordpress editor:
[resource]
[link href=”http://api.netflix.com/users/T1G.NK54IqxGkXi3RbkKgudF3ZFkmopPt3lR.dlOLC898-/queues/instant?feed_token=T1v23xnWpcYnhhkIsQ_iyASermOnPjgFKP77FdaXGkWEqUvwrPAjTeVHlgLpMlx2FF&oauth_consumer_key=k5mds6sfn594x4drvtw96n37&output=atom” rel=”http://schemas.netflix.com/feed.queues.instant” title=”Instant Queue”][/link]
[link href=”http://api.netflix.com/users/T1G.NK54IqxGkXi3RbkKgudF3ZFkmopPt3lR.dlOLC898-/rental_history/returned?feed_token=T1ksEAR97Ki14sIyQX2pfnGH0Llom4eaIDMwNWlUOmRZ0duD2YDbp_5PPUKBcedH51XSxPTnUOI5rCLz9feBXx9A–&oauth_consumer_key=k5mds6sfn594x4drvtw96n37&output=atom” rel=”http://schemas.netflix.com/feed.rental_history.returned” title=”Titles Returned Recently”][/link]
[/resource]Each link contains an href attribute pointing to the actual feed URL, as well as a rel attribute describing the type of data available for that link, and a human-readable title attribute. In our case, we want the “Titles Returned Recently” feed, which is available at http://api.netflix.com/users/T1G.NK54IqxGkXi3RbkKgudF3ZFkmopPt3lR.dlOLC898-/rental_history/returned?feed_token=T1ksEAR97Ki14sIyQX2pfnGH0Llom4eaIDMwNWlUOmRZ0duD2YDbp_5PPUKBcedH51XSxPTnUOI5rCLz9feBXx9A–&oauth_consumer_key=k5mds6sfn594x4drvtw96n37&output=atom (note the XML escapes &s in URLs as XML entities, so you have to un-escape them to get the actual URL). As you can see, this feed URL looks like a normal API request, including my userID on the path, but with an extra feed_token parameter, which is different for each available user feed. This way, the ATOM feed can be fetched without having to do any OAuth signing, so you can drop it in your feed reader or aggregator of choice and it should just work. And giving access to one feed won’t let anyone access your other feeds, since they’re each protected with their own feed_token values.
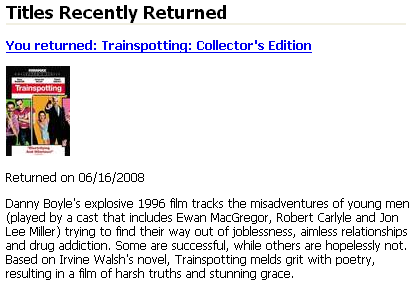
- Fetch the feed of recently returned movies. Now you can just fetch the feed URL you found in the previous step (in my case, http://api.netflix.com/users/T1G.NK54IqxGkXi3RbkKgudF3ZFkmopPt3lR.dlOLC898-/rental_history/returned?feed_token=T1ksEAR97Ki14sIyQX2pfnGH0Llom4eaIDMwNWlUOmRZ0duD2YDbp_5PPUKBcedH51XSxPTnUOI5rCLz9feBXx9A–&oauth_consumer_key=k5mds6sfn594x4drvtw96n37&output=atom), and you’ll get nicely formatted “blog posts” back for each movie the user recently returned. Here’s a sample of how the formatted ATOM entries look:
Of course, if you want to format the results differently, you can make a REST API call for the same data, e.g. http://api.netflix.com/users/userID/rental_history/returned OAuth-sign it like you did in step 6, and you’ll get all the meta-data for each movie returned as XML, including various sizes of movie poster image. - Profit! Now you’ve got a way to let your users provide access to their netflix data, which you can use in a variety of ways to enhance your site. If this is the first time you’ve used OAuth, it might have seemed a little complex, but the good news is it’s the same process for all other OAuth-protected APIs you may want to use in the future.
I hope you found this helpful. If anything is confusing, or if I made any mistakes in my write-up, please leave a comment so I can make it better. Otherwise, let me know when you’ve got your Netflix integration up and running!
Liked this post? Follow this blog to get more.